By   April 18, 2025

Work continues on the FJ-55.  The passenger side A-pillar is coming together.  It’s on the rotisserie now and I seem to have acquired an L110F transmission.  An HF1A seems to fit on the back.


1976 Land Cruiser FJ-55 project.

By   April 6, 2025

A friend offered me a truck that he’s had on his TODO list for over 20 years.  This truck has been sitting in his car-port, covered in various bits of detritus.  After almost an hour of excavation, I was finally able to see the truck.  Code-name:  Terrible Idea.


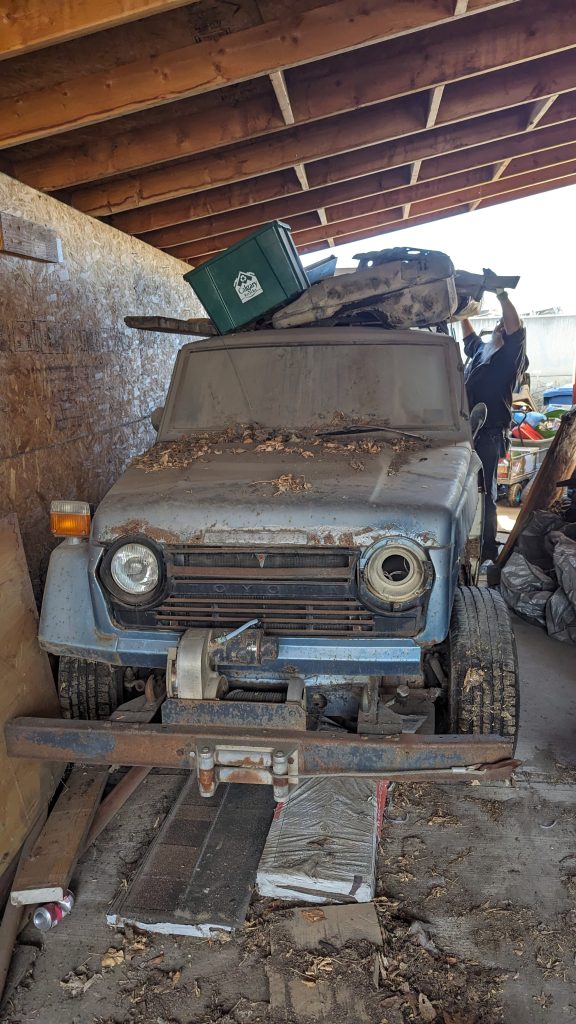
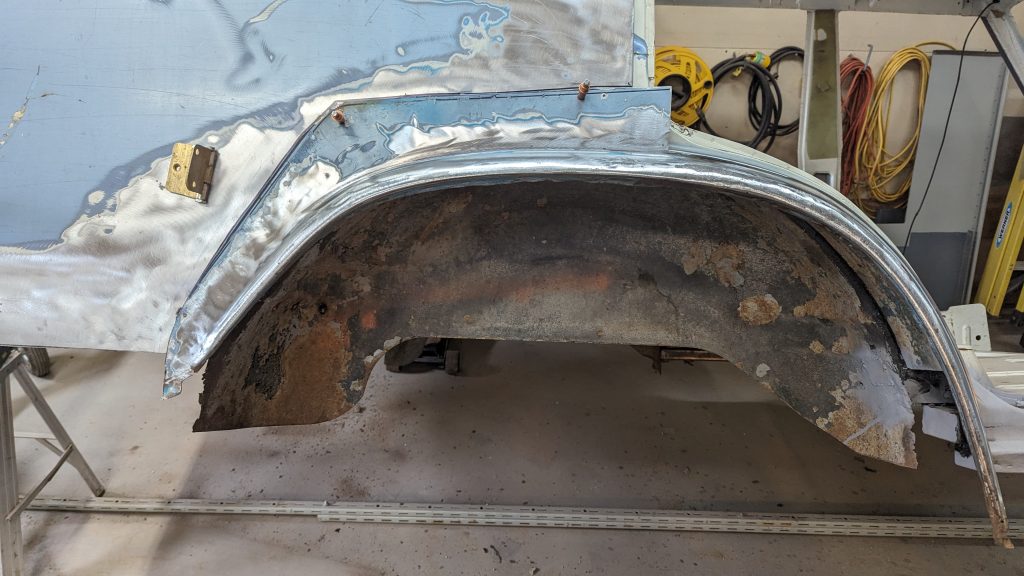
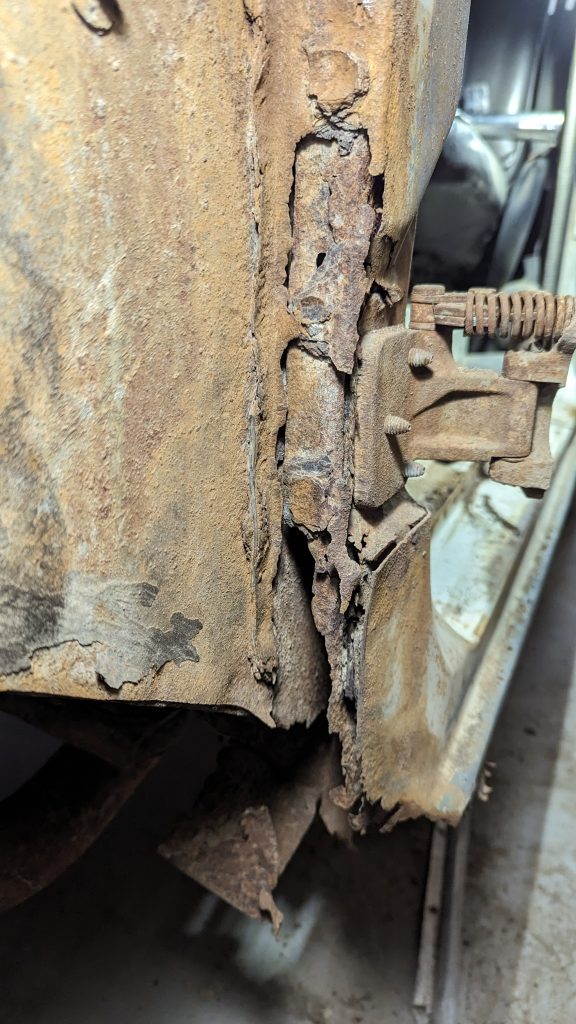
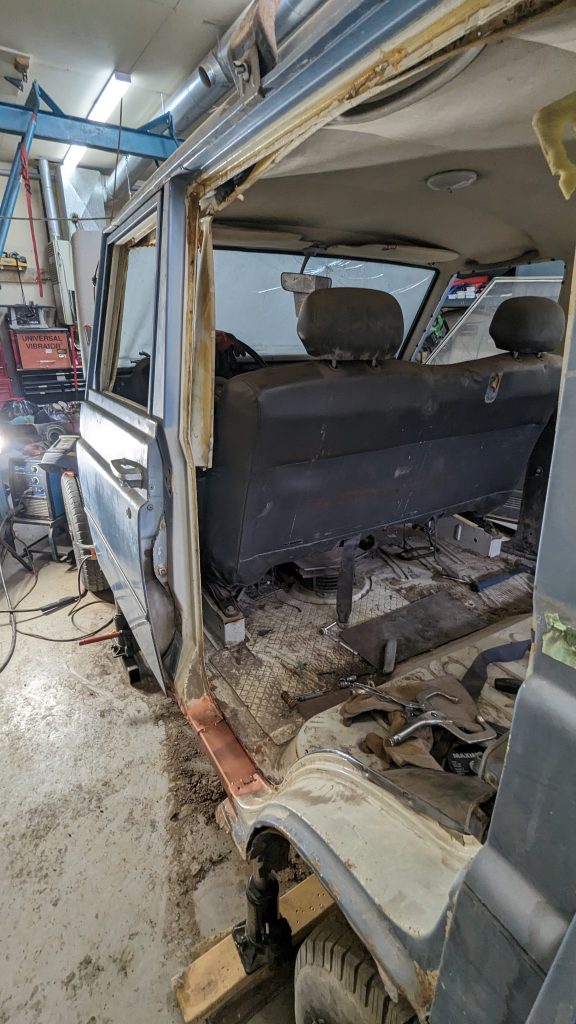
What are my plans for it?  I’ll save that for a later post because I’m not entirely clear yet.  First order of business is to deal with rust and missing metal.  Its biggest problem is the A-pillars that the front doors are mounted to are completely rotted.

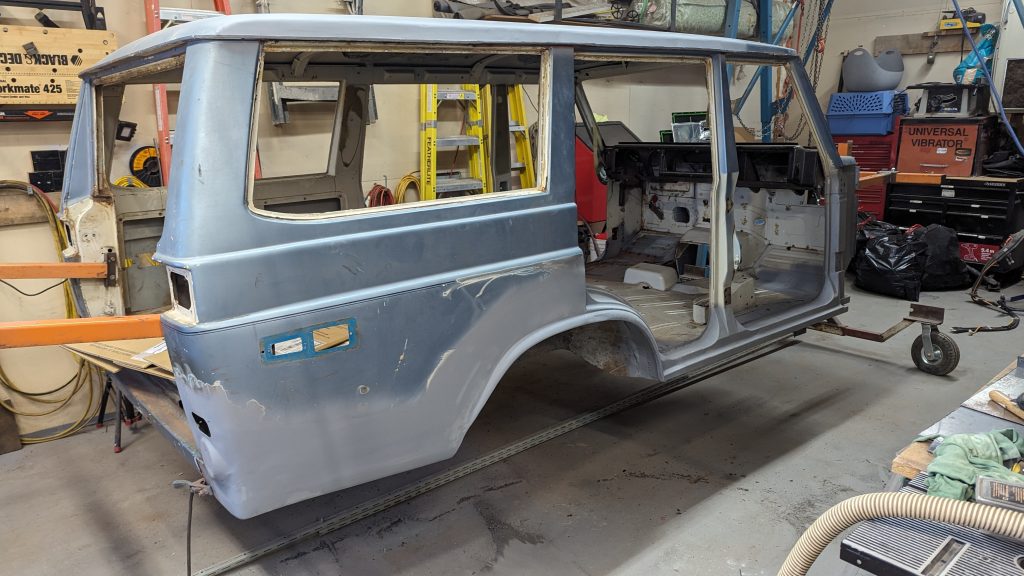
The first decision I’ve made is not to do a museum level restoration.  I want a truck that looks cool and still looks like an FJ-55 but a purist would immediately know something has been done to it.

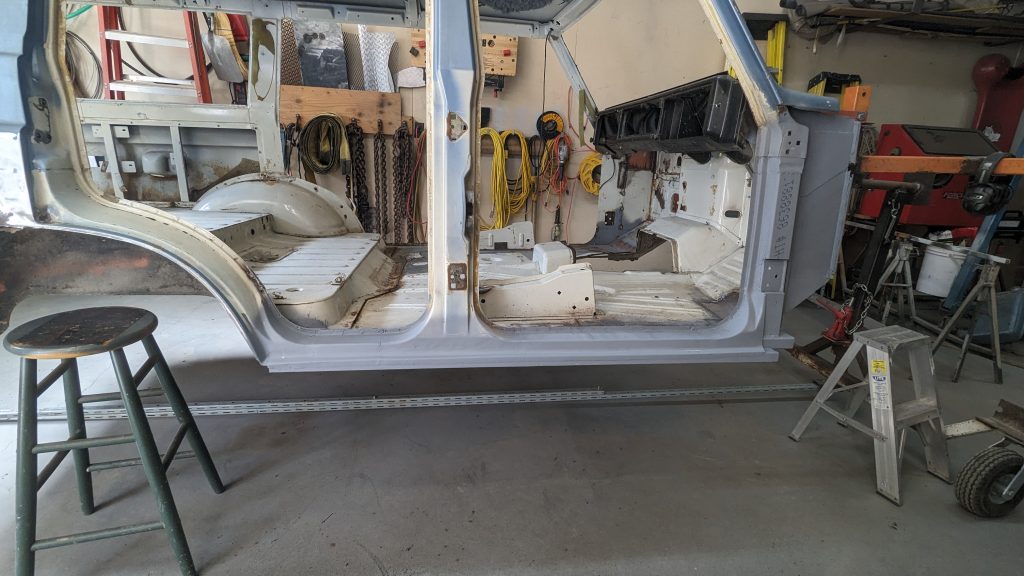
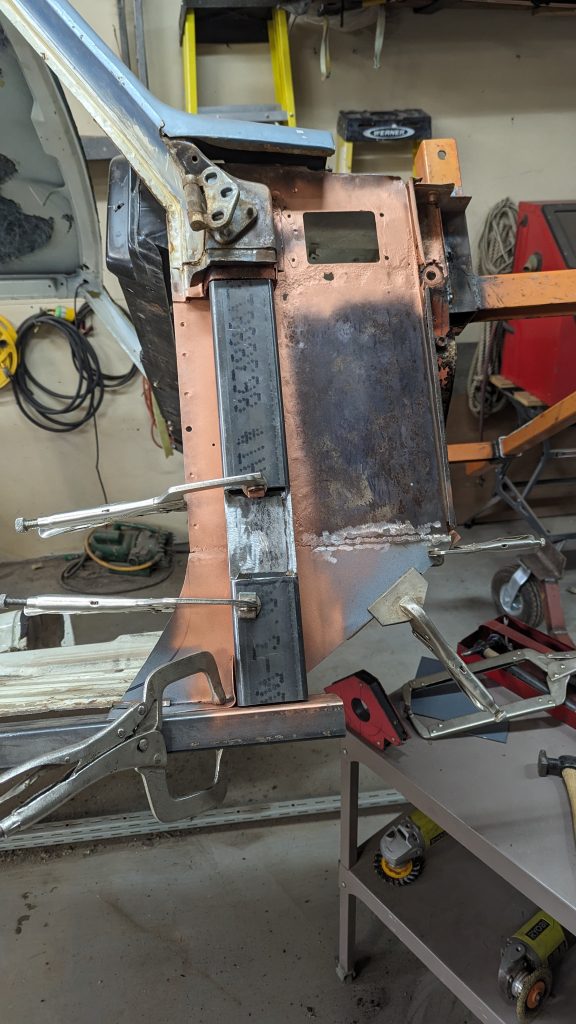
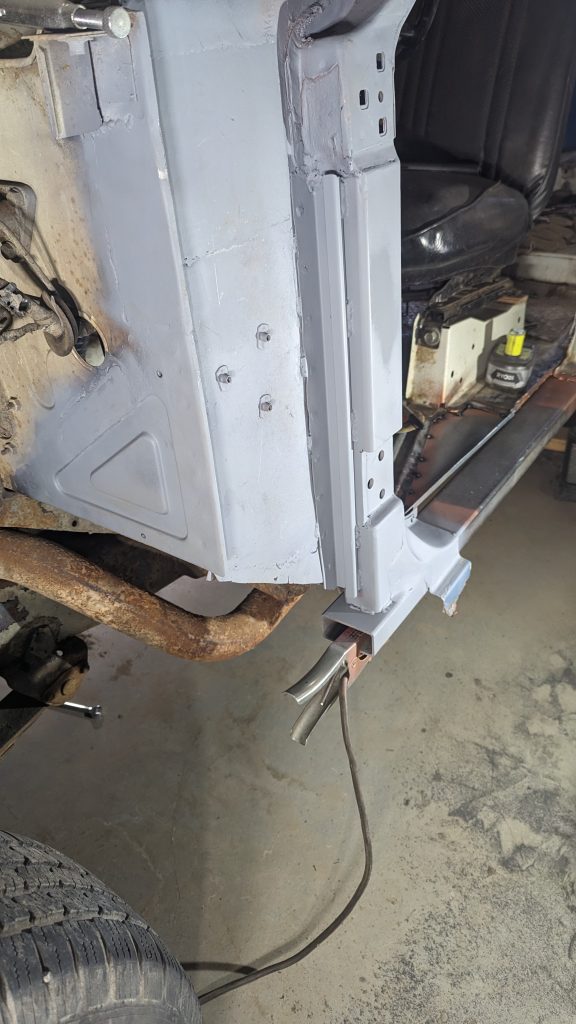
First order of business was to tackle one of the A-pillars to see how doable it is.  If those are too difficult, then the project is a no-go for me.  Fortunately, they proved doable given the technology I possessed.  I built the A-pillar out of some 2x3x.188 rectangular tubing.  I mated it to some 1.5x3x.250 rectangular tubing to replace the almost completely missing rocker panels.  I did a floor patch while I was in there.  Lots of spot welds to drill out.  Not sure I’ll go to that extend on the passenger side.

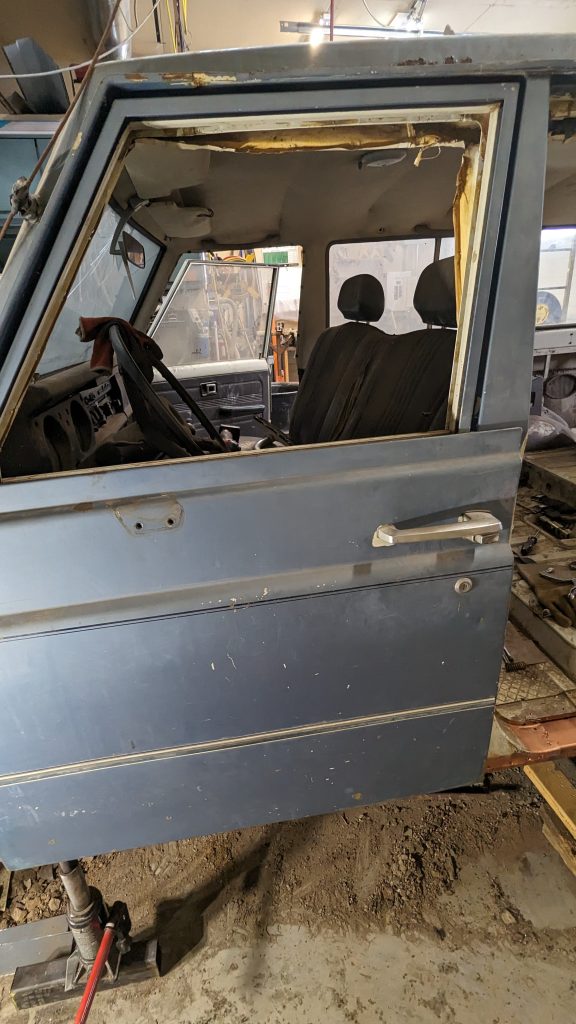
The drivers side front door mounts perfectly and lines up nicely and opens/closes cleanly.   This project has now passed the ‘doable’ gate.

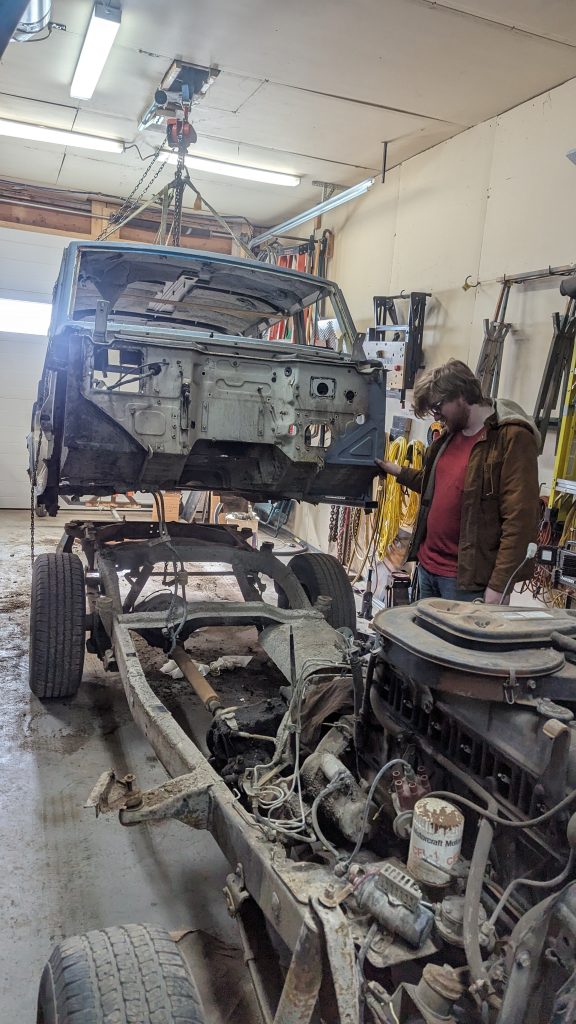
Next order of business was to dismantle the interior and build a rotisserie.

rat-ratgdo – Home Assistant.

By   November 25, 2024

My truck is too long.  The Ford website says 20’3″.  The space between the front and rear garage doors is 21′ even.  That doesn’t leave a lot of margin for error when driving in.

Enter Rat-ratgdo. This is a board that can link with Liftmaster/Chamberlain Security 2.0 garage door openers.  It can read the state of the door, sensors, and control the door.  With ESPHome firmware, it links easily to HomeAssistant.

I moved the obstruction sensor for the rear door up to the height of my bumper.  When the bumper clears, the rat-ratgdo obstruction sensor switches from “Problem” to “OK”.

This allows me to create an automation:

When I drive in the back door, a light in the ceiling turns on as soon as I block the obstruction sensors and turns off again when the sensors are clear.  If the light doesn’t turn on when I drive in, then I know that HomeAssistant isn’t working so then I just have to look in my rear view mirror and watch the blinking LED of the obstruction sensors which is slightly more error prone.

Re-create proxmox containers and VM’s from existing raw images.

By   November 20, 2024
  • Find your backups.
  • Extract pct.conf from backups
    • tar xvf /mnt2/mpv-pve/dump/vzdump-lxc-101-2024_11_16-00_03_50.tar.lzo ./etc/vzdump
  • Create null_template.tar.gz
for I in 105 103 102 101; do cat $I/etc/vzdump/pct.conf | grep -v ^lxc | grep -v "^#" | sed -e 's/^/\-/' -e 's/: / /' | xargs pct create $I /mnt/pve/nfs-beernas-containers/template/cache/null_template.tar.gz; done
for I in 100 120 121 122; do mkdir -p /tmp/$I; lzop -dc vzdump-qemu-$I-*.lzo | vma config - > /tmp/$I/$I.conf; done
for I in 100 120 121 122; do cat /tmp/$I/$I.conf | grep -v '#' | sed -e 's/: / /' -e 's/^/\-/' | xargs qm create $I; done

…and to avoid this pain in the future:

5 0 * * 0 touch /mnt/pve/nfs-beernas-backups/.timestamp
0 0 * * 0 find /mnt/pve/nfs-beernas-backups -name config.dump.* \! -newer /mnt/pve/nfs-beernas-backups/.timestamp -print | xargs rm
0 0 * * * sqlite3 /var/lib/pve-cluster/config.db .dump > /mnt/pve/nfs-beernas-backups/config.dump.$(date --utc +%Z%Y%m%d%H%M%S).sql

Faulty Phillips dimmable bulbs.

By   October 7, 2024

Our bathrooms have dimmable LED bulbs in open fixtures.  One of the bathrooms has been experiencing bulb failures after a very short period of time.  I started tracking the failures and it’s approximately 3-4 weeks between failures.  The failure mode is the bulb will suddenly become very dim and possibly occasionally flicker; even at full brightness setting.

I tried changing the dimmer (from a Leviton LED compatible to a Lutron LED compatible) and that didn’t prolong the bulb life.  I started marking the bulbs with sharpie when I installed them and the last 3 bulbs failed on:

  • 7/18/2024
  • 8/8/2024
  • 9/10/2024

The two bathrooms have the same fixtures and dimmers so why was it only in one bathroom that this started happening?  Turns out because the other bathroom also has Phillips dimmable bulbs but they’re an older model.  (The type that has a plastic base with a plastic globe glued to the base).  The new type are all glass so the electronics are inside the edison fixture.

I decided to dismantle one of the failed bulbs and here is what I found.   To me the failure mode is obvious.  The glue used to attach the base to the bulb has flowed onto the heat-sensitive driver chips and covered them up preventing them from dissipating heat.

I’ve tried contacting Phillips Canada and I’m sure we’re all surprised to discover they could care less.

Update 10/15/24:

One of the bulbs in the other bathroom did fail. I thought it was one of the older style but when I pulled it, I realized it was one of the same as the others that are failing.   This one went in 03/27/2024 and lasted until 10/13/2024.  It lasted a lot longer (though still not the lifetime I’ve come to expect from an LED bulb). It appears to have the same over-gluing problem but it was clearly clocked a bit when the glue went on so it didn’t displace the thermal paste as it did on the above bulb.   Probably explains why the increased life.

Edit 02/12/2024

Had another of these bulbs fail.  This one was installed in 09/09/2024 and lasted until 02/10/2025.  Not quite a record and still pretty dismal.


I’ve since switched to Amazon Basics dimmable bulbs and haven’t had any failures but it’s only been around 3 months.  They’re also around half the price though.

Migrating from MediaWiki to Bookstack.

By   April 21, 2024

My long relationship with MediaWiki is over.  It’s been over for a while if I’m honest.

Anyway, there’s no trivial way to import MediaWiki data into Bookstack but here’s what I did:

  1. First I installed Bookstack.
  2. Then export MediaWiki data to xml:

    php maintenance/dumpBackup.php –current –include-files > /tmp/all_pages.xml

  3. Clone https://github.com/outofcontrol/mediawiki-to-gfm

    ./convert.php –filename=/tmp/all_pages.xml –output=/path/to/converted/files

  4. Find where your images went:

    php maintenance/dumpUploads.php

  5. Clone

    https://github.com/Yetangitu/bs

  6. Go to your bookstack implementation and get an API key.
  7. Follow the instructions for ‘bs’ to configure it with your API key.
  8. use ‘bs’ to create books/chapters/pages using the data from step 3.
  9. Upload the images from step 4.
  10. A bunch of manual cleanup and reorganizing.


This is not for the faint of heart but it’s also not difficult.  Just a bit tedious.

Hateful gate controller

By   March 19, 2023

I’m essentially lazy. After installing a gate on the end of the driveway, we quickly tired of getting out of the car to open and then close the gate behind us. I bought a gate actuator which came with a couple of linear actuators and a controller. Since we don’t have wired power out there, I also needed a battery and solar panel plus charge controller.

The charge controller it came with was shit and the panel was too small, so I bought a new panel and charge controller. That solved that problem. No longer getting ‘Low Voltage’ warnings from the gate controller.

The next problem was access for friends. See the article https://www.beer.org/blog/index.php/2022/07/03/playing-with-fiducials/

Another annoyance was that if we were expecting a friend or courier or other, we had to walk down the driveway with a remote, and after getting close enough to the gate, press a combination of buttons in order for the gate to open and stay open.  Then before bedtime, we had to remember to walk down the driveway to close the gate which is particularly disquieting in the dark where a hundred reflective eyeballs are looking at you from the surrounding forest.  There was also no way to know whether the gate was actually open or closed without also going for a walk.

To help address this last annoyance, I added a VHF radio module connected to a BLE dongle and a relay module with a set of ADCs to read the limit switches.  A bit of Micropython and I could send queries to the dongle to get the state of the limit switches, and press buttons remotely.  Add in some MQTT handling and I have a link to HomeAssistant.


Unfortunately, now I have 2 boxes mounted out by the gate, one with the clunky COTS gate controller+battery, and another with the barnacles that I added to the system:

There must be a better way.  The heart of the system is the COTS controller board which is really just a couple of H bridges, some current sensing, limit switch inputs and push button inputs.  Time to start experimenting.

Playing with Fiducials.

By   July 3, 2022

As part of some tinkering I was doing with my robotics team, I was learning about AprilTags.  Coincidentally, I had also recently installed a gate opener at the front gate and was struggling with how to organize guest access.

I grabbed my OpenMV camera, a spare buck/boost converter, and an old Axis surveillance camera housing.  Put it all together and mounted it to a post in front of the gate:

 
Google Photos Refresh Token invalid. Please authenticate from Photonic → Authentication.
Error encountered during authentication:
{
  "error": "deleted_client",
  "error_description": "The OAuth client was deleted."
}
See here for documentation.

I played with the QR Code recognition and various families of AprilTag. While the QR Code recognition worked fine and allowed me some nice flexibility in terms of content, it was more fallible under varying light conditions. AprilTags are more robust and recognized pretty quickly from a few feet away.

The code is simple:

import sensor, image, time, math, omv, utime
import pyb
import machine


thresholds = ( 150,255 )
sensor.reset()                      # Reset and initialize the sensor.
sensor.set_pixformat(sensor.GRAYSCALE)
sensor.set_framesize(sensor.QQVGA)
sensor.set_auto_gain(False)
sensor.set_auto_whitebal(False)
sensor.skip_frames(time = 2000)     # Wait for settings take effect.
clock = time.clock()                # Create a clock object to track the FPS.

tag_families = image.TAG36H11|image.TAG36H11

last_tag = 0
tag_repeat_cnt = 0
tag_repeat_threshold = 5
rtc = pyb.RTC()

def set_rtc(epoch):
    dt=time.localtime(int(epoch))
    rtc.datetime(tuple(dt))


P1_PIN="P4"
P2_PIN="P5"
p1 = 0
p2 = 0

STATE_NORMAL=0
STATE_STAY_OPEN=1
STATE_STAY_CLOSED=2

state = 0
rtc_valid = 0

red_led = pyb.LED(1)
green_led = pyb.LED(2)
blue_led = pyb.LED(3)
ir_leds = pyb.LED(4)

# micropython Epoch is 2000-01-01.  My timezone is UTC+8.
epoch_fixup=946728000


def set_p1(dur=0):
    p1.low()
    red_led.on()
    time.sleep_ms(dur)
    p1.high()
    red_led.off()


def set_p2(dur=0):
    p2.low()
    green_led.on()
    red_led.on()
    if (dur == 0):
        return
    time.sleep_ms(dur)
    p2.high()
    green_led.off()
    red_led.off()

def init_gpios():
    p1=pyb.Pin(P1_PIN, pyb.Pin.OUT_PP, pyb.Pin.PULL_DOWN)
    p2=pyb.Pin(P2_PIN, pyb.Pin.OUT_PP, pyb.Pin.PULL_DOWN)
    p1.high()
    p2.high()

    return p1,p2

p1,p2 = init_gpios()
blue_led.on()

i=0
while True:
    if i > 10:
        sensor.sleep(True)
        time.sleep_ms(500)
        sensor.sleep(False)
        i = 0
    i = i+1

    img = sensor.snapshot()         # Take a picture and return the image.
                                    # to the IDE. The FPS should increase once disconnected.
    tag_list = []

    try:
        tag_list.extend(img.find_apriltags(families=tag_families))
    except (MemoryError, OSError):
        pass

    for tag in tag_list:
        if tag.id() == last_tag:
            tag_repeat_cnt = tag_repeat_cnt + 1
        else:
            tag_repeat_cnt = 0
            last_tag = tag.id()

        if tag_repeat_cnt > tag_repeat_threshold:
            if tag.id() > 1 and tag.id() < 100 and state==STATE_NORMAL:
                print("Access granted (FRIEND): {}".format(tag.id()))
                set_p1(1000)

Obviously this isn’t super secure but most people who are breaking into houses aren’t sophisticated enough to know about Fiducials. Most people will assume the camera is for someone in the house to remotely activate a switch. I am actually using somewhat different code.

Because the only power I have out there is the deep cycle battery running the gate controller, I put the OpenMV to sleep for 1/2 second at a time. Seems to do ok and has gotten through an entire winter with temps that fell to -40C.

3D printer upgrade, Klipper, thermistors, and power supplies.

By   September 29, 2020

Boring preamble

It took forever for my 3D printer to reach temperate and then the bed heater just stopped working. Not sure what happened.  So friend Derwyn gave me a spare Prusa magnetic heated bed.  This was a terrific gift!

Bad: it’s 24v and the rest of my printer is 12v.

Good: I had a 24v 60A DC power supply!

Good: I had a Creality CR10s v2 controller that has both 12v and 24vdc inputs.

Bad: my extruder heater was 12v, fans were 12v, etc.  I don’t have a spring steel sheet.

Good: those items are cheap on Amazon.

Anyway, to make along preamble shorter, I changed everything all at once except some acrylic and some bolts.   I also decided Klipper was worth a try because Marlin is a disgusting mess of nearly incomprehensible twisty #ifdef’s and my printer was a mashup of several different printers.  Let me tell you, Klipper is a breath of fresh air and worthy of a different blog post.

Meat of this article

I was having trouble getting the PID on the extruder to settle on a temperature.   Especially the high temperatures (230+):

PID can't settle this down


It took forever for prints to start because Klipper could not get the printer to the proper temperature.

I accidentally stumbled upon this Hackaday post which is a link to this fellow who helpfully outlines the process to change a capacitor to better filter power on the CR10s v2.0 board that I have.  Could that be the problem?

So first I decided to check the current state of things.

Power with Extruder running.

Power with Extruder and Bed heater running


Here’s the best part.  Normally, Octoprint turns on the bed heater first, and when that comes up to temperature, it turns on the extruder heater.  However, I turned on the extruder first and set it to 260C.  Then I turned on the bed heater.  The two photos above show that.  Here’s what happened on Octoprint:

Note how Klipper was able to use PID to get the temperature under control until I turned on the bed heater


Look how the poor power filtering was affecting the ADC measurements for the Extruder heater?  The NTC 100k (B3950) thermistors only read 380ohms (approx) at 240C.  That means a difference of only a few ohms at high temperatures has a big affect on temperature.  So voltage swings will dramatically affect ADC measurements, causing havoc with PID!

I didn’t feel like waiting for Digikey and paying the shipping so I used a 220uf electrolytic capacitor instead.  Ugly as fuck but much better.


New lab!

By   August 28, 2020

The whole Covid-pocalypse thing has expedited our move to DebtRidge.  It was a temporary move and we’re mulling whether to make it more permanent, or at least, invert the weighting on where our possessions are located.

This created a new problem; not enough room for me to do my ‘lab’ type stuff.  The 28’x36′ shop is great for big dirty work (welding, grinding, sawing, transmission rebuilds, etc) but not so good for hot air rework, 3D printing, etc.

Here’s what I had to do for 3D printing in the meantime:

Oddly enough, one of the companies I work for had a portable building previously used by CATSA as a Portable Screening Unit (xray, walkthrough metal detectors, preflight security) and it was just sitting there doing nothing.  This portable building was able to collapse to a size barely legal for road transport, was able to lift itself up high enough for a truck to back a trailer under it, and has a 20kW generator!

After a couple of years of sporadic but persistent querying on my part, finally I was given approval to buy this building from my customer.  Now I had a new problem:  Where to put it.

A bit of excavation and compacting later and here we have it:

The next problem was transport.  It took 2 months of research until I arrived at something cost effective and reasonably possible. To spare the details, the end result is I paid to have it trucked to the road in front of the driveway, and then had 2 friends come over to back it down the driveway on a trailer I rented in Sundre.

Loaded and on the way to DebtRidge

In front of the driveway.

Ready to lower onto the rental trailer

Not much room to spare

On the pad just after removing trailer. Standing on 3 legs.

Powered up and expanded

20kW diesel generator!

Initial layout.

I have lots more stuff to put in and set up but at least it’s functional now.