Author Archives: hpeyerl

Linux: add a USB network interface to a bridge

By   January 11, 2018

I have some Raspberry Pi0Ws that I’m connecting to a LAN via the USB gadget network driver on a Raspberry Pi3.  The problem I encountered was that the usb[0-3] interfaces weren’t showing up when the Pi3 booted because the Pi0w’s booted later.  Only ‘eth0’ appeared on ‘br0’.

You need to make sure to add the usb[0-3] interfaces to the Bridge when the Pi0w’s boot.  This also works if Pi0W’s are plugged in after the Pi3 is already booted.  A simple change to /etc/network/interfaces is all it took to make this happen:

auto br0
iface br0 inet dhcp
bridge_ports eth0 usb0 usb1 usb2 usb3
bridge_stp off
bridge_fd 0
bridge_waitport 0

allow-hotplug usb0
allow-hotplug usb1
allow-hotplug usb2
allow-hotplug usb3

auto usb0
iface usb0 inet static
address 10.0.0.1
netmask 255.255.255.0
up ifconfig usb0 up
up brctl addif br0 usb0

auto usb1
iface usb1 inet static
address 10.0.0.2
netmask 255.255.255.0
up ifconfig usb1 up
up brctl addif br0 usb1

auto usb2
iface usb2 inet static
address 10.0.0.3
netmask 255.255.255.0
up ifconfig usb2 up
up brctl addif br0 usb2

auto usb3
iface usb3 inet static
address 10.0.0.4
netmask 255.255.255.0
up ifconfig usb3 up
up brctl addif br0 usb3

Note the IP addresses on the individual usb[0-3] interfaces are irrelevant. Those are present only so I can bring the interface ‘up’.

Venstar ColorTouch T7900

By   December 11, 2017

The thermostat arrived and I was excited.  I plugged it in on my bench at home and the first thing I found was the temperature sensor was off by about 5F.  I knew I could set the calibration in the menus but wasn’t sure if the amount it was off was linear or not.  I contacted tech support and received a response back almost right away. After a couple of back/forths with tech support, they offered to send me a wired temperature sensor to try instead.  That was on November 12th.   Since then, I’ve updated the firmware on the thermostat and now it has, twice, locked up completely.  I have to cycle the power on it to get it to come back.  I fired off another question to tech support and received no response.

It is now December 11th and I’ve not heard anything from tech support since the first instance on November 12th.

In the meantime, I’ve mounted the thermostat on the wall and hooked it up to my furnace and it seems to work fine enough.  I’ve also modified a few scripts so I can continue to monitor it remotely. I’ve even written a bit of an API for it in Python.

It hasn’t hung on me since I mounted it to the wall so I’ll continue to keep an eye on that.

It’s still a great thermostat as long as you don’t want tech support.

Edit: Tech support is actually responsive.  The problem is that my emails don’t reach them.  They claim to have never received any emails from me even though I’ve confirmed in my mail logs that their MX has accepted my message.  If I communicate with them via their web-form then tech-support is very responsive.  Clearly they have some aggressive anti-spam filters on their email that are generating false-positives.

Thermostat with no cloud control

By   November 5, 2017

If you’ve looked at the rest of my blog you’ll see that I’m a bit of a control freak.  I like to gather data and use that to monitor and control my environment; specifically our cabin.   When we first bought our cabin and put in the new furnace, I also bought an RCS TR60 thermostat with an RS-485 interface.  I wrote some python scripts to monitor it (and put data into a Mysql DB) as well as control it with the primary goal of setting the temperature before we leave home so the house would be at a comfortable temperature when we arrive.   As a side effect, I also used the Heat setpoint as an occupancy signal to HomeAssistant.   Unfortunately, before buying the TR60, I also bought a Radio Thermostat CT80.  A month or so after installing the CT80, we arrived at the cabin to find the inside temperature was over 90F and the buttons on the CT80 were unresponsive.   The unit failed in the ON position.  This is only slightly better than failing in the OFF position (frozen pipes anyone?).

Well, after 8 years, the RS485 interface on our TR60 has stopped responding.  The thermostat still works but I just can’t communicate with it through the serial interface so it’s time to buy another one.   Anyone whose tried to do the same will be disappointed that the vast majority of thermostats out there require cloud access.  Ignoring the sheer stupidity of handing over control of your house to a third party with unknown security and coding practices, it also assumes an active internet connection and finally, assumes the company isn’t going to decide one day that its business model can no longer sustain its cloud service. In the latter case, you end up with nothing more than an old fashioned smart thermostat.

It looks like there are a few options for us out there:


  • Radio Thermostat
    • see above for why this is a bad idea
  • RCS TW45
    • tried to get someone to even give me a price on this and failed
  • Venstar ColorTouch
    • These guys have a developer site and nicely document the API for you!


Another option is to build your own using an Arduino or Raspberry Pi.  I’m very much not in favor of this approach.  There are a lot of edge cases that I can think of and, as someone who does embedded firmware for a living, think that my time is better spent elsewhere.  My furnace is not a hobby; it’s something I want to “just work”.

Having learned from my RadioThermostat days, I’m going to buy myself a couple of the old-style mechanical thermostats.  One I will wire in series with the heat wire to prevent the inside temperature from getting too high and the other I will wire in parallel with the heat wire to prevent the inside temperature from getting too low.  This way I can ensure that any failure of my smart thermostat will not end up with frozen pipes or excessive gas/electricity usage.

I’ll report back on how the Venstar ColorTouch experience goes.

Use Environment Canada Weather forecast atom feed to decide whether to irrigate

By   August 20, 2017

I have more or less switched to using Home Assistant to automate things at the cabin.  One of the things I’ve had to do is integrate the Etherrain/8 from QuickSmart into HomeAssistant by creating a new component and switch module.  This is currently (as of this writing) on a branch waiting for release integration.

Now the next thing was to automate the irrigation.  HomeAssistant’s automation scripts take a bit of getting used to.. It’s certainly not very intuitive but it is what it is.

First the automation, to water the front beds at 7 AM on Mon/Wed/Fri if the chance of rain is <60%:

    - id: water_front_beds_on
      alias: Start Watering Front Beds mon/wed/fri at 7AM
      initial_state: on
      trigger:
        platform: time
        hours: 7
        minutes: 0
        seconds: 0
      condition:
        condition: and
        conditions:
          - condition: state
            entity_id: binary_sensor.rain_unlikely
            state: 'on'
          - condition: time
            weekday:
              - mon
              - wed
              - fri
      action:
        service: switch.turn_on
        entity_id: switch.front_beds

So the next question is likely “where does rain_unlikely come from”?  It’s here:

    binary_sensor:
      - platform: threshold
        name: rain_unlikely
        threshold: 59
        type: lower
        entity_id: sensor.environment_canada_pop
    
      - platform: mqtt
        state_topic: environment_canada/pop
        name: environment_canada_pop

Essentially, an MQTT message with a percentage that is the “probability of precipitation”.  But who generates this MQTT message?  In fact, nobody really.  This is just a placeholder sensor that holds the POP.  But something must populate this. Well, here’s an Appdaemon script written in Python:

    import appdaemon.appapi as appapi
    import feedparser
    import sys
    import time
    import datetime

    class EnvCanada(appapi.AppDaemon):

      def initialize(self):
        if "locator" in self.args:
          loc = self.args["locator"]
        else:
          loc = "ab-52"  # Default to Calgary
        if "hr" in self.args:
          hr = int(self.args["hr"])
        else:
          hr = 4
        if "ahead" in self.args:
          add=int(self.args["ahead"])
        else:
          add = 0

        myargs={}
        myargs["loc"] = loc
        myargs["add"] = add
        myargs["module"] = self.args["module"]
        # First run immediately
        h = self.run_in(self.get_pop, 1, **myargs)
        # Then schedule a runtime for the specified hour.
        runtime = datetime.time(hr, 0, 0)
        h = self.run_once(self.get_pop, runtime, **myargs)

      def get_pop(self, args):
        loc = args["loc"]
        add = args["add"]
        d=feedparser.parse('http://weather.gc.ca/rss/city/{0}_e.xml'.format(loc))
        weekdays=["Monday","Tuesday","Wednesday","Thursday","Friday","Saturday","Sunday"]
        today = (weekdays[time.localtime().tm_wday+add])
        pop = 0
        for entry in iter(d.entries):
          if today in entry.title:
            if "howers" in entry.title:
              pop = 100
            if "POP" in entry.title:
              next=0
              for word in iter(entry.title.split(" ")):
                if next:
                  pop = int(word.rstrip("%"))
                if word == "POP":
                  next=1
        print("{0}: Got POP {1}".format(args["module"], pop))
        self.set_state("sensor.environment_canada_pop", state = pop)

      def terminate(self):
        self.log("Terminating!", "INFO")

This essentially grabs the Atom feed from Environment Canada, looks for the word “Showers” or “showers” or “POP” and generates that percentage.  It then reaches under the skirt of Home Assistant and populates the above mentioned ‘MQTT sensor’.. I really wish I could think of a better way to do that.

Just for the sake of completion; here is the AppDaemon configuration to get it all started:

  EnvCanada:
  module: environment_canada
  class: EnvCanada
  hr: 5
  ahead: 0
  locator: ab-53

The ‘ahead’ attribute is “how many days ahead to determine the POP.  Ie: at 0, it returns todays probability of precipitation.  At 1, it will return tomorrow’s.   the ‘hr’ attribute is when AppDaemon should run this script.  In this case, at 05:00AM.  The ‘locator’ is the portion of the URL that specifies which Environment Canada weather location to use.  ‘ab-53’ is Sundre Alberta.


Hope that helps someone.


Upverter … meh …

By   January 6, 2017

Angus and I are working on a project together and he decided to try to do the PCB using Upverter. He’s had some limited success with it at one of his customer sites and as we all know, KiCad isn’t exactly the easiest tool in the bench…

I haven’t been interacting with the design much, mostly just hovering around and doing some schematic review.. Conceptually, the Upverter collaborative approach has potential but in practice, seems to mostly fall flat on its face.  I’m not sure you can expect much more from something written in javascript and I’m surprised they got this far with it.  Thus far I’m finding that it can grind Google Chrome to an absolutely stand-still on my brand-new MacbookPro to the point where my radioparadise stream has to rebuffer  (and I have 175mbps link to the internets) and if you look at it wrong, it hangs the tab that it’s in.

Upverter might be an ok hobbyist tool but $100/month/seat, they’re dreaming.  Maybe at $5.00/month for hobbyists but in no universe is any enterprise going to buy into this.  I’ve spent time using Mentor Graphics which is an actual enterprise tool and Upverter is like comparing Sketchup to Autodesk Inventor.

In addition to instabilities, I haven’t quite figured out how to communicate with my collaborator(s) in Upverter and it would seem that there isn’t actually a way.  That’s a very obvious omission for which there is a lot of precedent (google docs anyone?)… I want to highlight an area of the schematic and refer to it in a chat window… I feel kind of stupid because I can’t see how something like this isn’t prominent in the app but I just can’t find it.

The next major irritation is screen real-estate.. When I’m doing CAD, I want to see as much of my design as possible.  I try to make toolbars go away but with the Upverter app running inside a browser tab, I lose a ton of screen real estate to the URL bar and the tab bar. Then inside the tab is the Upverter toolbar that also doesn’t appear to want to be hidden away in any fashion.

This is all just from browsing around.  I haven’t even tried to design anything with it.   It just reinforces my conclusion that online ‘software as a service’ type applications are a waste of time and I’m taking bets on just how long Upverter will be around.  I certainly wouldn’t put any of my designs on there because I don’t see them being around in a year or maybe two at the most.

Modifying a Proxmox LXC container

By   December 23, 2016

I was introduced to the awesomeness that is Proxmox VE and got down to convering my old virtual server to Proxmox VM’s… Along the way I decided some of my VM’s didn’t need to be VM’s but that LXC containers would be just fine.  After making my second container, I got tired of running the same handful of commands (create a user account, git clone my dotfiles, install tmux, etc) so decided to investigate modifying the Ubuntu 16.04 template.  This turns out to be very easy using ‘vzdump’.


So here’s another “memo to self”.

First build a container, set it up the way you want it, then use vzdump to create a tarball of it.  Copy it to your templates directory and you’re done:

cd <container template dir>
vzdump -dumpdir . 102
gzip vzdump-lxc-102-2016_12_23-07_53_55.tar
mv vzdump-lxc-102-2016_12_23-07_53_55.tar.gz ubuntu-16.04-mpv_1604-1_amd64.tar.gz

NFS client mount within a Proxmox LXC container.

By   December 23, 2016

Another “memo to self” …


[ Edit: minor change for Proxmox 5.x at bottom]

Having trouble doing an NFS mount from within a Proxmox LXC container?  A google search took me here and it pretty much answers the question but doesn’t work with Proxmox 4.4-1.  The error I was seeing after following the advice in the above was:

apparmor="STATUS" operation="profile_replace" profile="unconfined" name="lxc-container-default-cgns" pid=11339 comm="apparmor_parser"

So you also need to edit /etc/apparmod.d/lxc/lxc-container-default-cgns and make it look like so:

# Do not load this file. Rather, load /etc/apparmor.d/lxc-containers, which
# will source all profiles under /etc/apparmor.d/lxc

profile lxc-container-default-cgns flags=(attach_disconnected,mediate_deleted) {
 #include <abstractions/lxc/container-base>

# the container may never be allowed to mount devpts. If it does, it
 # will remount the host's devpts. We could allow it to do it with
 # the newinstance option (but, right now, we don't).
 deny mount fstype=devpts,
 mount fstype=nfs,
 mount fstype=cgroup -> /sys/fs/cgroup/**,
}

and then subsequently do:

service apparmor reload

Edit: On proxmox 5.2-1 the file is /etc/apparmor.d/lxc/lxc-default-cgns.  The rest of the above is still correct.

Radon in our basement

By   November 27, 2016

Some folks at work were talking about their radon detectors the other day. Since I’m a sucker for gathering data, I was curious and did some reading. I’m usually not one for crackpot science and ‘radon’ just sounds like it would fit right in.

The first link I get when I type “radon” into Google is the Health Canada website and the second is Wikipedia.  Ok, maybe this isn’t so crackpot after all.

In short, radon is a colorless odorless gas.  Why is it that everything that wants to kill us is either colorless and odorless or furry and brown?   Radon is produced as a result of the decay of uranium which is in soil, rock and water. Normally it seeps out of the ground and dissipates in the air where it does us no real harm with a half-life of only 3.8 days (unlike furry brown things which don’t dissipate and have much longer half-lives).  It can cause problems when it seeps out of the ground and is trapped, say, under the concrete slab in your basement looking for a way in.  Once inside the living space of your home, when radon is inhaled, it breaks down further and emits an alpha particle, which I’ve read can strike a lung cell and cause cell death or worse, damage.  If a cell is damaged in a particular way, it can cause cancer.  As I am not a “nukular scientist” I won’t go into any more detail at the risk of confirming that I am a fool to those readers who already suspect it.    Statistically, however, the data is clear:  16% of lung cancers in Canada are caused by radon, as compared with 83% caused by smoking (Health Canada).

If the radon is under the floor of your basement, how does it get into the house? Unfortunately, it’s a very sneaky gas.  It can seep right through concrete but usually prefers to enter through cracks or the seams between your basement walls and floor; or any openings like those left for plumbing cleanouts.  As many of you know,  we spent about five years renovating our Bergen home which included sealing it from top to bottom and adding a heat exchanger to keep the air fresh while reducing the amount of lost energy.  Normally when it’s cold outside and your furnace comes on to heat your cold toes, that warm air rises and looks to escape through your ceiling (stack effect)…  Even the wind blowing on one side of your home can create a lower pressure area on the other side of your home pulling valuable warm air from inside the house.   All of that escaping air creates a slight negative pressure in your home and must be replaced by air from elsewhere.  Since most of our homes are relatively well sealed, that makeup air has to come from somewhere so it gets pulled from the under slab in your basement through the cracks and openings I mentioned above.

At first I thought I would measure the radon in our home.  We have a heat recovery ventilator and  I figured that since the air is being exchanged quite frequently, it would not be an issue.  So I bought an electronic radon detector for about $250 and put it in the basement.  There are a few different varieties of detectors.  The less expensive ones are the type you put in your basement for three to six months and then mail away to a lab where they are analyzed and the results mailed back to you.  These can be had for approximately $20 but I wanted something a little more interactive so I went with the electronic version that can give a very approximate number within 24 hours and more accurate data as time goes on.

In Canada, radon is measured using “becquerels per cubic meter”.  The World Health Organization recommends a national guideline of 100 bq/m3.  Health Canada has set our guideline at 200 bq/m3.

Within 24 hours, the first reading that came back from our detector was 446 bq/m3.  Since this is a very rough number as a first reading, I decided to give it a week to get something closer to accurate.  Well, seven days later, the reading was substantially higher:  1031 bq/m3.
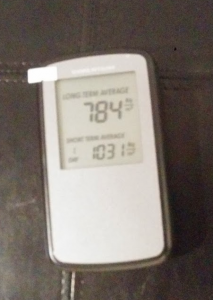
1031

More than five times what Health Canada recommends as the upper limit, and more than ten times what the World Health Organization recommends.

I decided then that it was time to do something.  My goal was to get our readings below 100 bq/m3.  I read up on mitigation methods and it looked promising.  The best way to mitigate the problem is before the house is built but obviously that’s not an option for us, so I had to look at a retrofit solution.   It turns out the way this is done is by installing a fan outside the home (or in the attic) to suck air through a hole in the concrete slab and blow it up and away from the home.  The theory is that the gravel underneath your basement floor is fairly porous, so even creating a negative pressure zone in one corner will eventually suck the radon from all over the slab.   Normally a radon contractor will be happy to come into your home and install such a thing for $3000 or so.  In our case, a plumber already left a convenient hole in our floor exposing the gravel at the bottom through which  we were mining for radon.
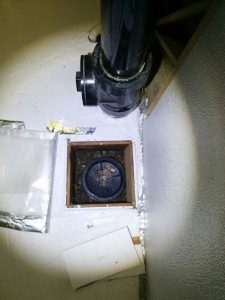
img_20161113_093509

I knew that I could probably seal the hole and maybe reduce the radon levels a bit but I also suspect that it wouldn’t be significant enough given the various effects of air pressure during the heating months or windy months.  I like to think I’m a fairly handy guy (how did Red Green put it?  “If the women don’t find you handsome, at least let them find you handy!”), I decided the right thing to do was to follow the recommended mitigation method and install the fan.  The fan itself was $300 plus another $100 in PVC pipes and fittings.   The fan needs to be mounted outside of the living space.  You don’t want it inside the living space because the other side of the fan is pushing high concentrations of radon gas and a small leak will have you back to mining for radon again.   It took about 6 hours of work but I finally had the fan hooked up outside the house and powered it up for the first time.  I reset the detector and waited.

24 hours later, the first reading came in.  38 bq/m3.  I was cautiously optimistic.  A week later, it read 2 bq/m3.

2

Now the drawbacks.  The fan is fairly loud when it’s running; especially at the top of the 4″ PVC pipe that’s sticking up the side of the house.  It’s also fairly ugly.  While the fan is fairly energy efficient, it does consume 82 watts which is about $50/year in electricity.

Over the next year, I’m going to experiment by running the fan periodically.  I’ll start with a 50% duty cycle and adjust up or down depending on the readings.  Since the fan noise isn’t significant inside the house, I’ll start by running it primarily at night and less during the day.   Ideally, I would have one of the very expensive detectors that can hook to a computer so I can add some more intelligent automation behind the process as is my nature.  I suspect I’ll be able to get by with running the fan far less during the summer ‘window open’ months.   Only the data will tell me.

Now back to figuring out what piece of technology will let me address the furry brown things.


socat on OS X – TCDRAIN returns Invalid Argument.

By   June 26, 2016

When using socat, as installed by ‘brew install socat’ on OS X, you will likely get this error when trying to proxy a serial device to another host via TCP:

TCSADRAIN, 0x7fffffffe148):Invalid argument

This is because OS X uses the FreeBSD termios interface and the bug is explained here:

https://lists.freebsd.org/pipermail/freebsd-ports-bugs/2015-March/304366.html

This is the patch you want to apply to ‘socat’:

https://bz-attachments.freebsd.org/attachment.cgi?id=154044


Unfortunately, ‘brew install socat’ just gives you someone else’s precompiled binary and you want to retrieve the source so you can apply the above patch.


Do it like so:


cd `brew --cache`
brew unpack socat
cd socat-1.7.3.1
curl https://bz-attachments.freebsd.org/attachment.cgi?id=154044 > patch
patch < patch
./configure
make
make install


pfSense openvpn client to generic openvpn server in bridge mode

By   May 27, 2016

This should really go into the ‘memo to self’ category but I don’t have one.  Regardless…

I have an Ubuntu VM running OpenVPN in Bridge mode (tap).  I wanted to bridge my cottage network to my home network using pfSense out at the cottage. In the process of making this work, a fair amount of googling was involved so I decided to aggregate all of the information in one place in case I ever needed to reproduce it.  Friend Kurt was running up against some of the same issues.


First, make sure your OpenVPN server is working and that you have the following client specific files available (filenames will likely vary):

  • site.ovpn
  • ca.crt
  • ta.key
  • client.crt
  • client.key

On the server, I had to make some minor changes to make everything work:

If you can ping client->server but the connection hangs when you try to edit a file or view a web-page

mssfix 142
fragment 1200

If on the client, you see “OpenVPN Bad LZO decompression header byte:”? I had to comment out “comp-lzo” on the server… This seems bogus but it made it work. Need to investigate this later.

The client says “Authenticate/Decrypt packet error: cipher final failed”, the issue is the cipher being used. The default on the server was “BF-CBC” but the pfSense default was “AES-128-CBC”. Change the pfSense to “BF-CBC” and you’re good to go.

The general procedure for making this work in pfSense is the following:

    • Go to System->Cert. Manager and add your server’s “ca.crt” to Certificate Authorities. Give it a descriptive name.
    • Then go to System->Cert. Manager->certificates and add your client.crt and client.key.  Give it a descriptive name as well.   Ensure you do this after you’ve added ca.crt so that when you add this certificate, it will reference the above ca.crt.
    • Go to VPN->OpenVPN->Client and click ‘Add’
        • Select Peer-to-Peer under ‘Server mode’
        • Select ‘tap’ under ‘Device Mode’
        • Select ‘WAN’ under ‘Interface’
        • Set your server host/address to your VPN server address.
        • Set the port accordingly.
        • Set description to something you’ll recognize.
        • Under TLS Authetication, set ‘Enable authentication of TLS packets’.  It will drop down a text box into which you can paste the contents of ‘ta.key’.
        • Set ‘Peer Certificate Authority’ to the one you added above.
        • Set ‘Client Certificate’ to the one you added above.
        • Set encryption algorithm to whatever your VPN server is using (BF-CBC in my case)
        • Under ‘Custom Options’, I had:

      mssfix 142
      fragment 1200

The final note I’d like to add is one about IP addresses. When you set your ‘server-bridge’ parameter on the server’s VPN config, you assign a pool of IP addresses that are not in your dhcp server’s range. By default, the IP addresses assigned are specific to the client certificate. So if you find your clients are all getting the same IP address, it is because they each need a unique client certificate. You can override this behavior using the ‘duplicate-cn’ directive in your server’s config file. It’s generally not a good idea though so you should just create unique client certificates.