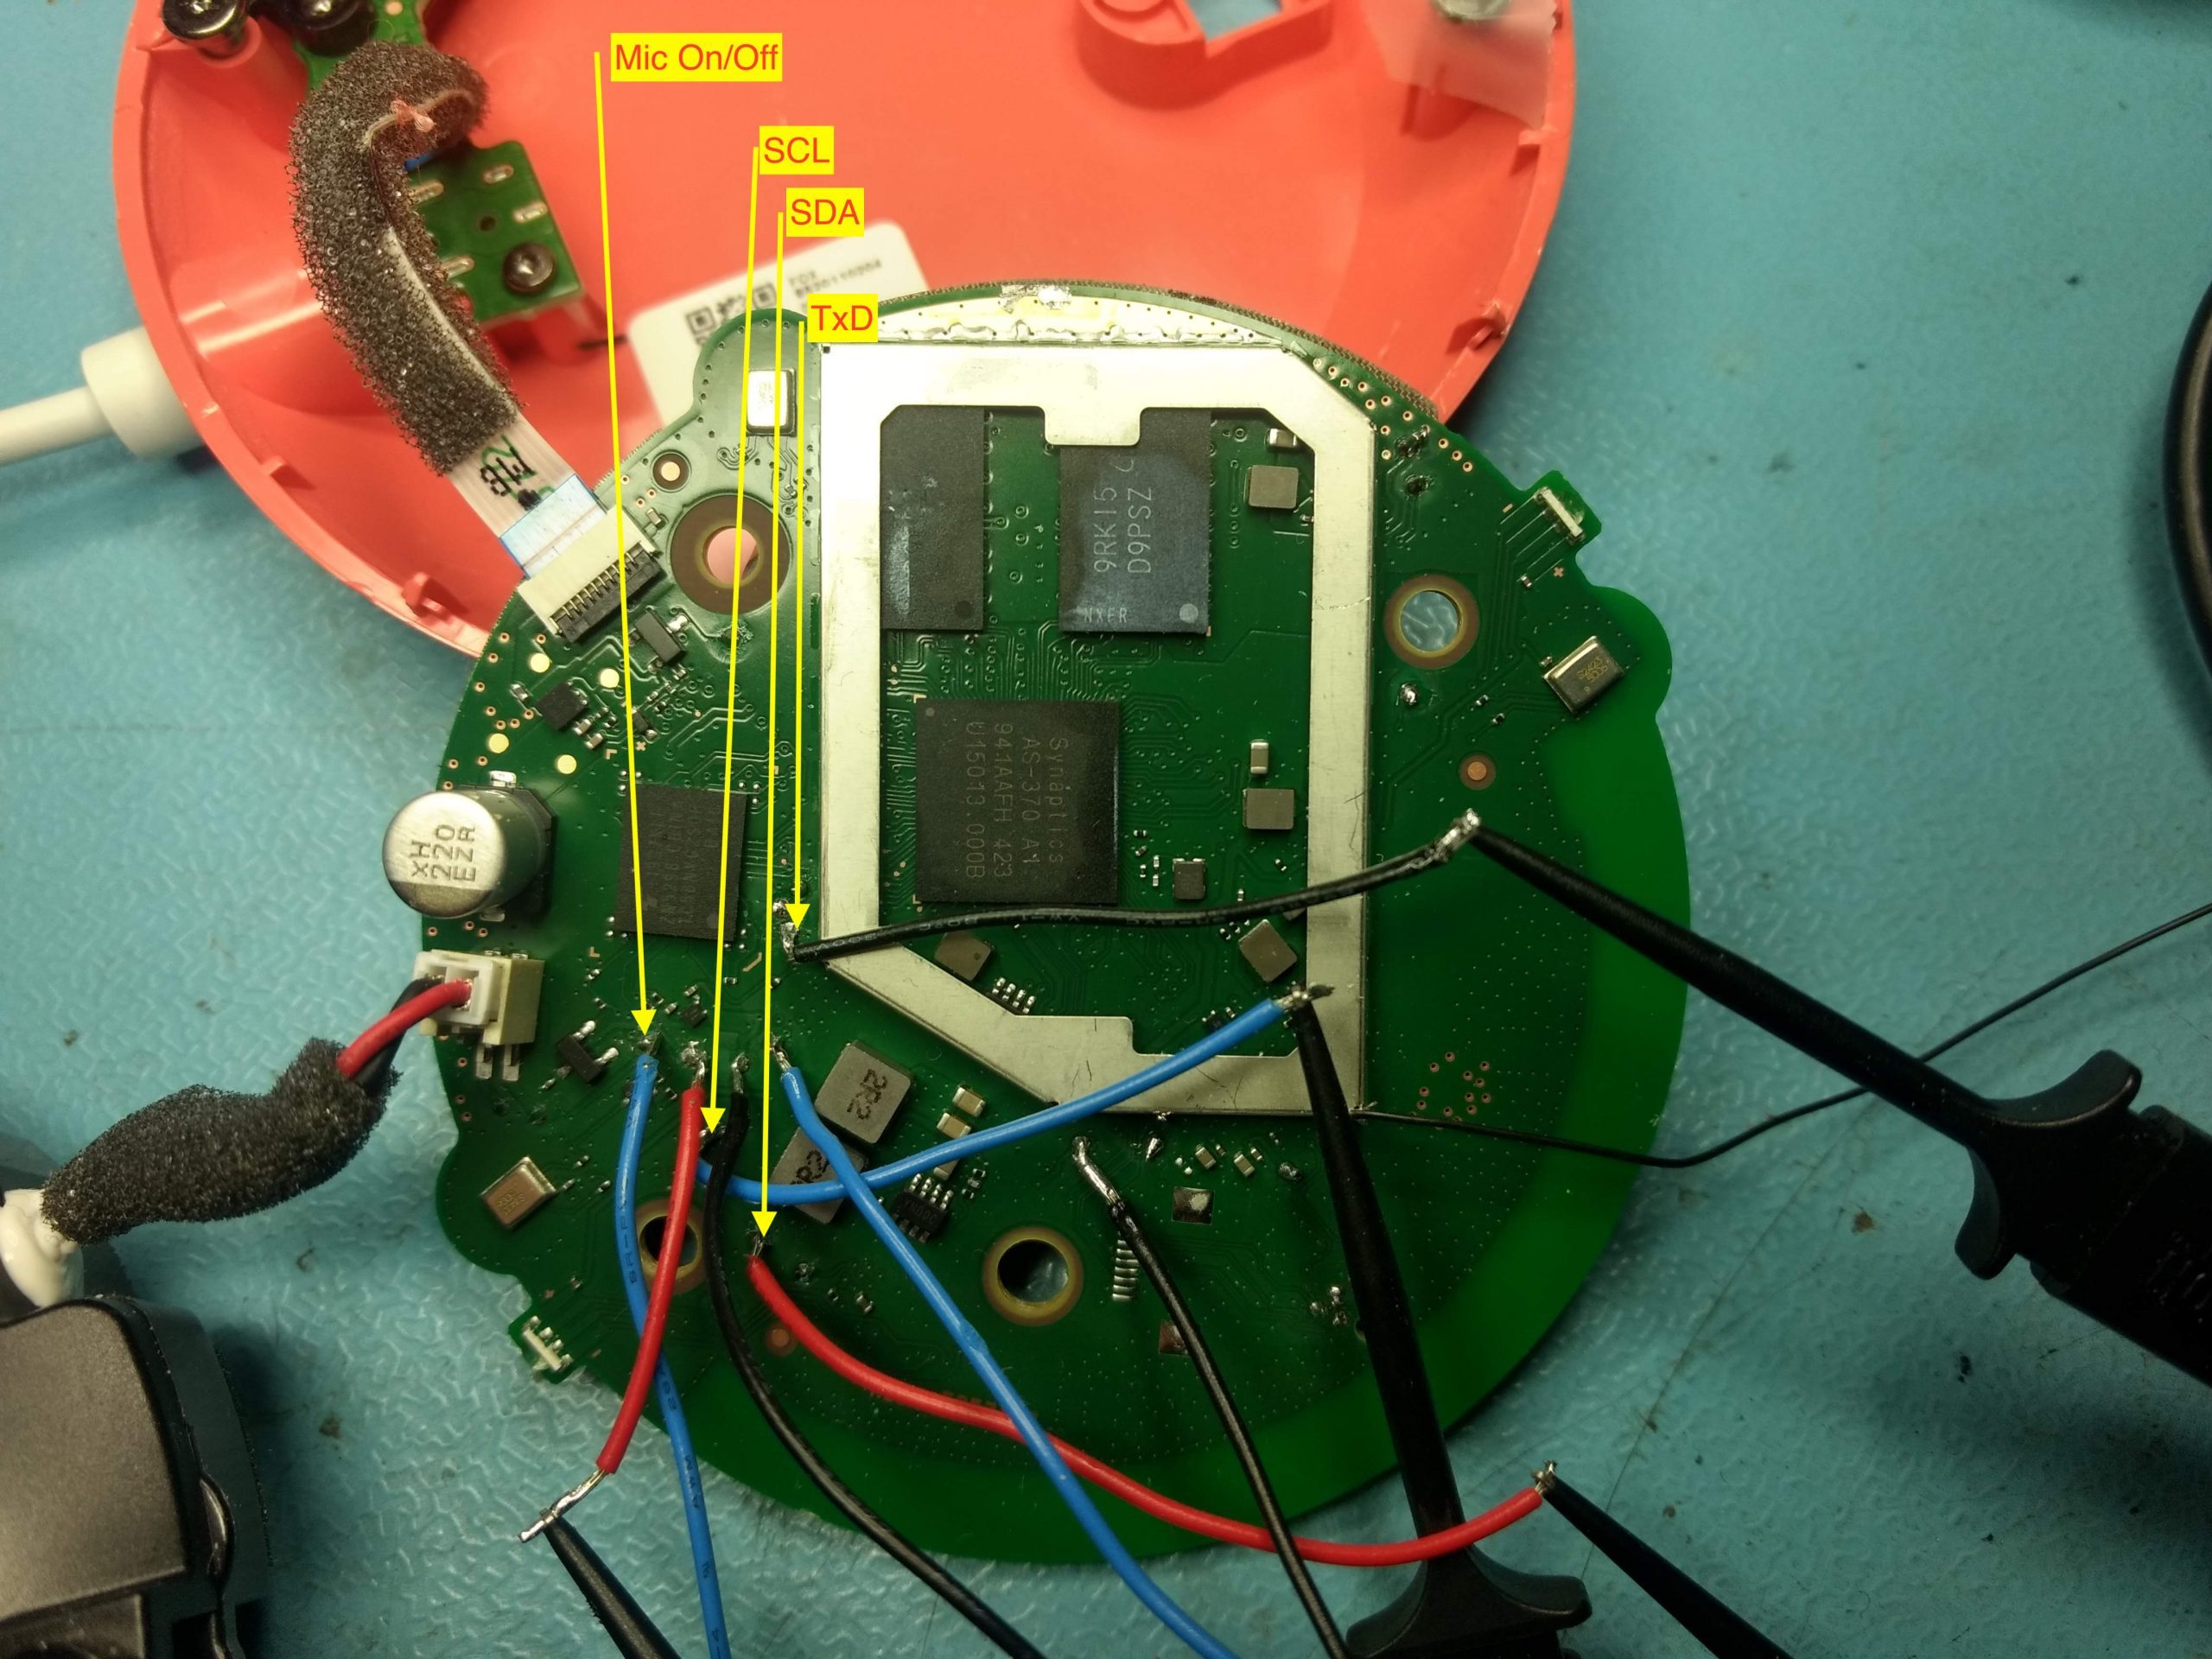
A few minutes more of playing around this morning. I think I found where the Mic On/Off mechanism is located. I think I found an I2C and a couple of devices on it (0x78, 10 bit?)(0x62 DAC?). I’ve started annotating where things are that I find.

A few minutes more of playing around this morning. I think I found where the Mic On/Off mechanism is located. I think I found an I2C and a couple of devices on it (0x78, 10 bit?)(0x62 DAC?). I’ve started annotating where things are that I find.
Google seems to be giving away these Nest Mini things so my son gave me one of his. While waiting for the family to wake up on Christmas morning, I decided to tear into it and see what’s inside. I’ve only been at it for a couple of hours so I don’t have much to report yet.
Once you get its pajamas off, you see a board with a cpu (Synaptics AS-370), some DDR, and what looks like a TC58NVG2S0HBAI6 4Gb NAND. On the back of the board is a Wifi/Bluetooth thing probably. I haven’t taken the RF can off yet.
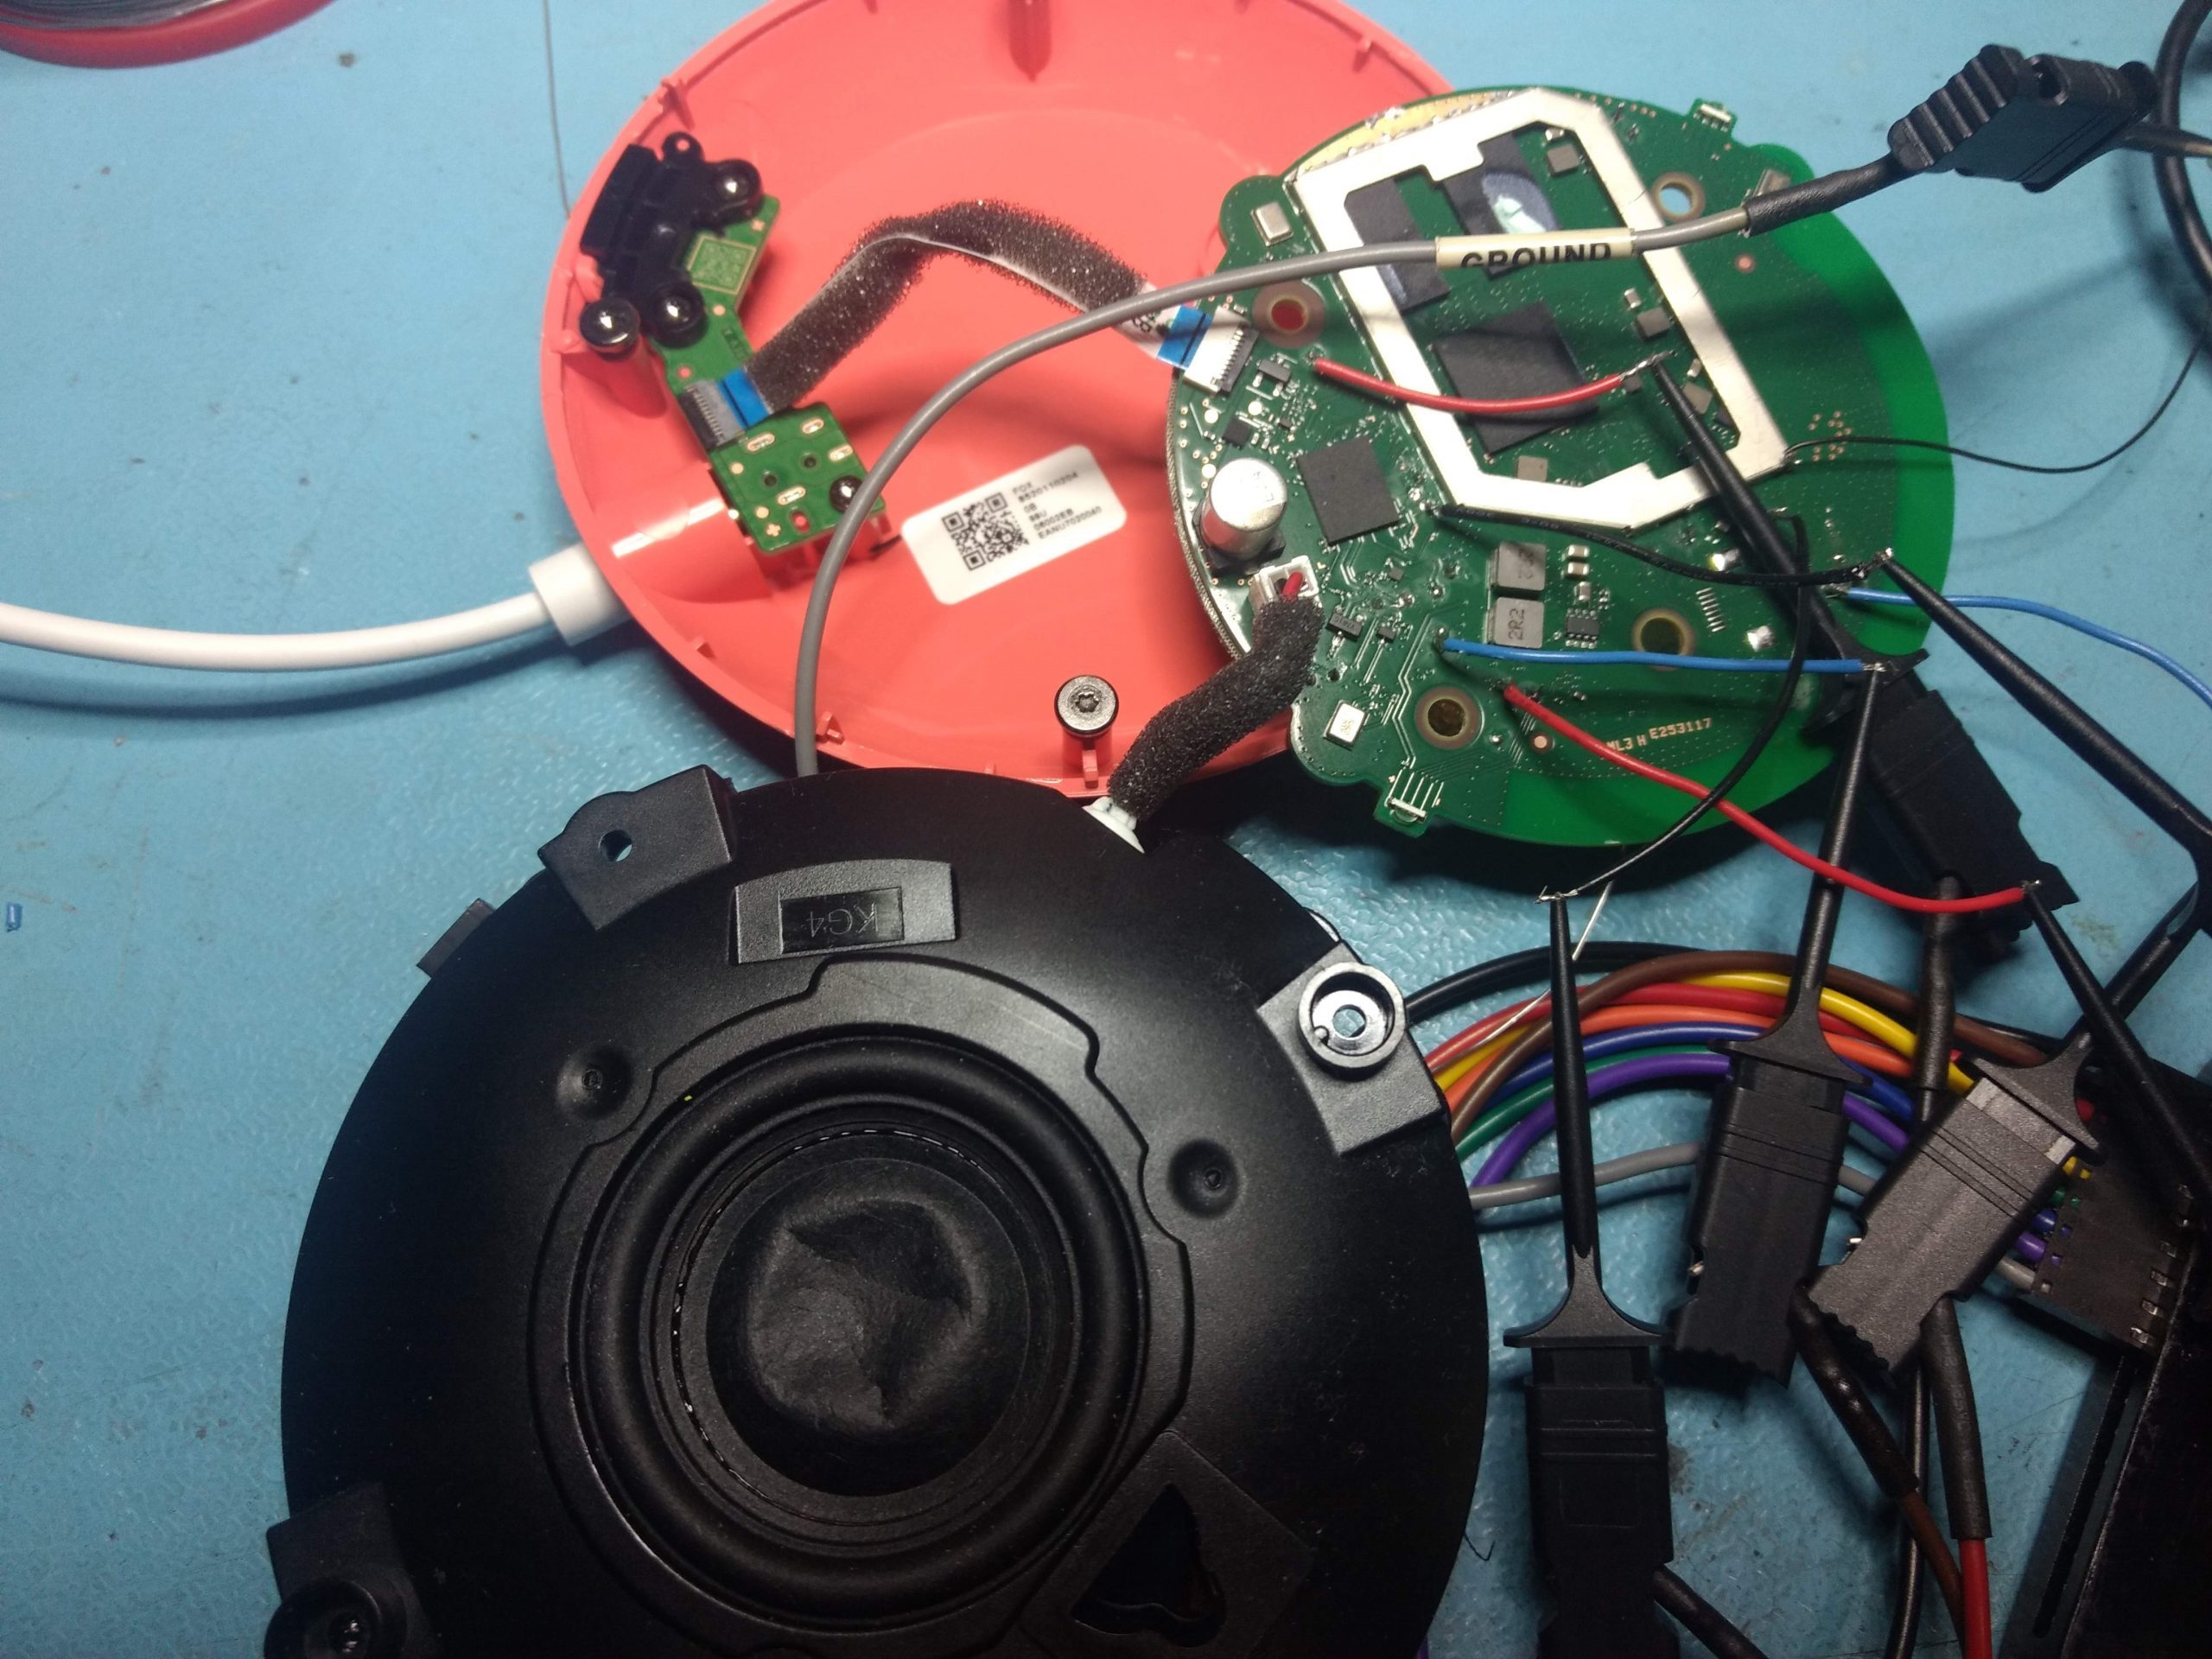
I usually start by soldering fly wires onto whatever test pads I can find and run the logic analyzer while I boot the thing in hopes I can find a serial port and maybe some I2C or SPI.
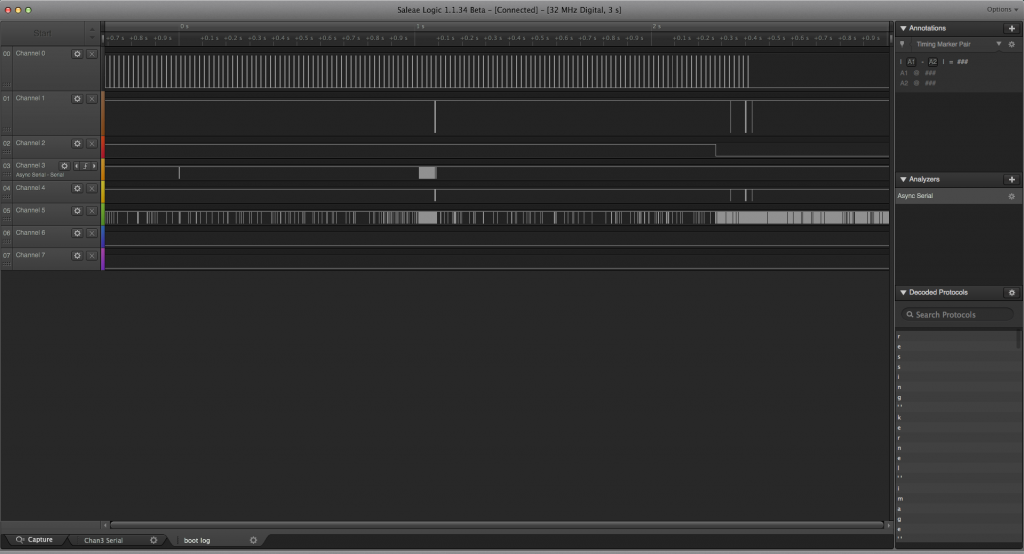
I found the serial port:
decompressing kernel image size 3866136…
kernel img addr 0x2080000, kern img len 12017672.
HACK! skip setup_android_kernel_param
mkbootimg bootargs: init=/init console= mtdblock.ro_fspart=”rootfs” ro nooverlayfs
Generated bootargs: init=/init console= mtdblock.ro_fspart=”rootfs” ro nooverlayfs
update opp V2 table to dtb
chip rev is A1
vl = 825000
vh = 900000
Got 2 value for vcpu vl and vh
chip rev is A1
Select PMIC chip sy8824b for Kernel !
Update silergy,sy8824!
Update cpu0-supply!
Delete silergy,sy20276 for Kernel !
Delete silergy,sy20278 for Kernel !
Delete silergy,sy20278 for Kernel !
Set dtb param for linux: ramdisk start 0xC3B0800, size 0x21EB30
chip rev is A1
chip rev is A1Boot normal GTV image
Start kernel at 0x02080000, dtb at 0x0be00000
Looks like it’s running a modified Google TV image just like the old Chromecast.
The Serial console is at 1.8v and I don’t have a USB<->TTL serial converter at 1.8v right now so it looks like that’ll be the end of that for now. I’m guessing it won’t let me interrupt the boot anyway and nothing appears after the kernel boots (see “console=” is blank).
Time to open presents.
After firmware update, the serial port is slightly more interesting:
bg6cd z1 erom: release id 0x5741fac, commit time Fri May 17 14:26:53 2019 -0700
bg6cd z1 hal : release id 0x8651a82, commit time Thu Jun 13 09:30:56 2019 -0700
disable pcie
ild-in module: release id 0xd32a267, commit time Fri May 17 14:29:05 2019 -0700
Load sysinit
Start ACPU
set vcore
DHL v0p90
hw_init done
custom table done
asking BCM to load miniloader.
try to verify flash miniloader
init syspll 400MHz
image2_init fitnsismh: erd,e lejaumspe iingd 0txo 85nbe5xt58 6i,ma cgoem.
m
it time Tue Jun 25 10:2’14’tz5_:l5o0a der2 0s1t9art .- 0b7oot0_0s
t
rap=0x00010003 (source=SPI Secure), boot_state=0x0
syspll 400MHz, 600MHz
set nna_sys at speed 600
set nna_core at speed 600
set avio_sys at speed 400
set nna_core at speed 600
set avio_sys at speed 400
set atb at speed 200
set perif_sys at speed 200
set apb_core at speed 100
set nfc_ecc at speed 200
set nfc_core at speed 200
pinmux 0 0 0 0
clk a1 a1
clk a1 121
ULT (byte[0:7]) = aba80aa2ac782956
NAND block size 0x40000, page size 0x1000, ecc_strength 0x30
— TZ_loader — bootloader
NAND block size 0x40000, page size 0x1000, ecc_strength 0x30
Read from block 1
nand read 1250000, 7f800, 800
lastK: 0x202c237, 0x202c237, 0xa1346d2
NAND block size 0x40000, page size 0x1000, ecc_strength 0x30
ret = 0
tz_loader: image4 verified.
tz_en image load verify success
ret = ffe00301
Load LastK: return value: 0xffffffff
ret = 0
tz_loader: image4 verified.
bl_en image read and verify success
feature:video/dolby_vision=true; feature:video/tcl_hdr=true;
tz_loader: start image4.
NOTICE: BL31: v1.3(debug):7bf8e6b
NOTICE: BL31: Built : 09:46:49, Jan 18 2019
INFO: ARM GICv2 driver initialized
INFO: BL31: Initializing runtime services
INFO: BL3-1: Initializing berlinspd
INFO: BL31: Initializing BL32
tz kernel starting… total 4 cpus, v3.2.0.9, May 29 2019 10:48:04@HEAD:cff79c5
INFO: BL31: Preparing for EL3 exit to normal world
INFO: Entry point address = 0x4580000
INFO: SPSR = 0x3c9
Board: valens-b4—— Entered Power_measurement_script() ——-
powerdown emmc
powerdown spi
powerdown pcie—— End Power_measurement_script() ——
Pinmux reg 0: 0xf7ea0840 = 0x08003049
Pinmux reg 1: 0xf7ea0844 = 0x00009200
Pinmux reg 0: 0xf7ea0840 = 0x08003049
Pinmux reg 1: 0xf7ea0844 = 0x00009200
Pinmux reg 2: 0xf7ea0848 = 0x00000000
Pinmux reg 3: 0xf7ea084c = 0x00000000
Pinmux reg 4: 0xf7ea0850 = 0x00001200
Pinmux reg 5: 0xf7ea0854 = 0x00000000
Pinmux reg 6: 0xf7ea0858 = 0x09209249
PMIC detected with SY8824B
cpupll: 1400
PMIC: SY8824B selected!
chip rev is A1
leakage info 626.
set Vcpu from 850000uv to 825000uv
Clock configuration:
fts: v11 loaded from 0x00028000
chip is warm boot.
****************************************************************
Read and setup kernel Image
****************************************************************
DBGDBG k_buff_img[0]=0x0
DBGDBG k_buff_img[1]=0x0
DBGDBG k_buff_img[2]=0x0
DBGDBG k_buff_img[3]=0x20
decompressing kernel image size 3888875…
kernel img addr 0x2080000, kern img len 12085256.
HACK! skip setup_android_kernel_param
mkbootimg bootargs: init=/init console= mtdblock.ro_fspart=”rootfs” ro nooverlayfs
Generated bootargs: init=/init console= mtdblock.ro_fspart=”rootfs” ro nooverlayfs
update opp V2 table to dtb
chip rev is A1
vl = 825000
vh = 900000
Got 2 value for vcpu vl and vh
chip rev is A1
Select PMIC chip sy8824b for Kernel !
Update silergy,sy8824!
Update cpu0-supply!
Delete silergy,sy20276 for Kernel !
Delete silergy,sy20278 for Kernel !
Set dtb param for linux: ramdisk start 0xC3B6000, size 0x21EF1C
chip rev is A1
chip rev is A1Boot normal GTV image
Start kernel at 0x02080000, dtb at 0x0be00000
The Xplornet modem out at DR has decided to become unreliable and needs a sporadic restart. I’ve been pleased with how well the TP-Link Kasa HS105 Wifi switches perform so I just needed to figure out how to get HomeAssistant to reliably monitor the internet connection and reset it without inducing an infinite power-cycle loop. This is what I ended up with. Seems to work ok.
In configuration.yaml:
device_tracker:
  platform: ping
   hosts:
     google: 8.8.8.8
     beer: 67.205.176.146
In automations.yaml:
- id: Ensure Internet is on
    alias: Ensure Internet is on
    initial_state: on
    trigger:
      platform: state
      entity_id: switch.internet
      to: 'off'
      for:
        minutes: 1
  action:
    service: homeassistant.turn_on
    entity_id: switch.internet

id: Ensure Internet is on at HA startup
  alias: Ensure Internet is on at HA startup
  initial_state: on
  trigger:
    platform: homeassistant
    event: start
  action:
    service: homeassistant.turn_on
    entity_id: switch.internet

id: Restart internet connection
  alias: Restart internet connection
  initial_state: on
  trigger:
    - platform: state
      entity_id: device_tracker.google
      to: 'not_home'
    - platform: state
      entity_id: device_tracker.beer
      to: 'not_home'
  condition:
    condition: and
    conditions:
    - condition: state
      entity_id: device_tracker.google
      state: 'not_home'
    - condition: state
      entity_id: device_tracker.beer
      state: 'not_home'
  action:
    service: homeassistant.turn_off
    entity_id: switch.internet
I was successfully running my DS414 with a combination of 4TB+4TB+4TB+1.8TB disks in two volumes. I wanted to increase capacity so I bought a 6TB seagate external disk because the price was right. I figured I’d pull the disk out of the chassis and slide it into my NAS. Mistake number one.
The disk inside the chassis was a Seagate ST6000DM003.
After waiting 3 weeks for the volume to resize I started using the Volume. My plan was to move some ProxMox containers and VM’s onto the Volume as part of a PVE update. But any reads/writes to/from the volume would cause the entire volume to lock up for 30 seconds at a time. This was causing Plex streaming to block as well. Something was wrong.
I used the Synology tools to try to figure it out but there was no help there. So I did what I do best and dove into the shell. I ssh’d and started digging around. After some digging, here is what I discovered.
Here’s the configuration:
/dev/sda – Seagate ST4000DX001
/dev/sdb – Seagate ST4000DX001
/dev/sdc – Seagate ST6000DM003
/dev/sdd – Western Digital WD40EZRX
/proc/diskstats showed that the weighted average IO completion time for the ST6000DM003 was 160x slower than the other disks:
sh-4.3# cat diskstats | grep ” sd[abcd] ” | awk ‘{print $3,$14}’
sda 5628640
sdb 5558600
sdc 946825590
sdd 5950130
I have a bad disk.
The more bad news is that Seagate’s website doesn’t appear to be able to pull up the warranty status because the disk serial number is not found on Seagate’s side. I probably have to get the serial number of the chassis. This probably implies that Seagate is not going to honor the disk warranty because I pulled it out of the chassis. I’ve sent a support request so we’ll see what I get back on that.
This morning, I find myself with a small corral of naked Yaks. I’m guessing most people know about Yak Shaving Here’s how it went this morning.
Actually, it started yesterday. I wanted to change the thermostat setting at the Cabin so it’d be nice and toasty when we got there. Can’t for some reason. Dig into the HomeAssistant console and discover the reason is that the component for my Venstar ColorTouch thermostat isn’t disabling the schedule so changing the temperature fails and generates an error from the thermostat. I should fix it.
I figure out how to fix the bug but in order to submit a patch, I need to upgrade my HomeAssistant installation.
So do all the requisite ‘git fetch; git merge upstream/….’ stuff, and then upgrade everything in the virtual environment.
Unfortunately, I can’t upgrade the virtual environment because my Python is too old.
Can’t ‘apt install’ a new Python because I’m on an old Ubuntu 16.04. Don’t want to go down that path right now.
Download a new Python, build, install.
Create a new virtual environment and reinstall all of the packages.
Installing packages fails (Twisted) because libbz2-dev wasn’t installed.
Install libbz2-dev.
Rebuild Python and reinstall.
Create a new virtual environment with the new python and reinstall all of the packages.
Installing packages fails due to a build problem with libopenzwave.
Looks like I need to upgrade my toolchain (g++ specifically).
I don’t like the look of that particular Yak. Lets try upgrading to Ubuntu 18.04.
My current version of ProxMox doesn’t support Ubuntu 18.04.
I need to upgrade ProxMox first. Oh, that’s the greasiest Yak yet. It’s a major version upgrade.
I should really just build a new ProxMox from scratch, while running the old one.
I don’t have enough hardware to build a new ProxMox server, even temporarily.
I think I’m on the last Yak. So in order to submit a patch against HomeAssistant, I need to go to the Hardware Store.
In the unlikely event that you’ve lost your Mysql ib_logfile[01] files, you will google and try to figure out whether you can get the data back. All the googling will tell you that all of your data is in those log files but that’s not true as of any recent version of mysql. I was looking around in /var/lib/mysql/zm/ and noticed the .ibd files were sizable which suggested the data was actually in there instead. After some googling, I found you can import data back into a freshly created Zoneminder DB.
I decided to uninstall/reinstall zoneminder from scratch and then recreate the DB:
https://stackoverflow.com/questions/18761594/how-do-i-do-a-clean-re-install-of-zoneminder
After doing that, I did the following:
(there are shell commands interspersed with the mysql commands so you can see the order of operations):
lock tables Devices write;
alter table Devices discard tablespace;
# cp -p saved/Devices.idb /var/lib/mysql/zm/
alter table Devices import tablespace;lock tables Events write;
alter table Events discard tablespace;
# cp -p saved/Events.idb /var/lib/mysql/zm/
alter table Events import tablespace;lock tables Filters write;
alter table Filters discard tablespace;
# cp -p saved/Filters.idb /var/lib/mysql/zm/
alter table Filters import tablespace;lock tables Frames write;
alter table Frames discard tablespace;
# cp -p saved/Frames.idb /var/lib/mysql/zm/
alter table Frames import tablespace;lock tables Groups write;
alter table Groups discard tablespace;
# cp -p saved/Groups.idb /var/lib/mysql/zm/
alter table Groups import tablespace;lock tables Logs write;
alter table Logs discard tablespace;
# cp -p saved/Logs.idb /var/lib/mysql/zm/
alter table Logs import tablespace;lock tables MonitorPresets write;
alter table MonitorPresets discard tablespace;
# cp -p saved/MonitorPresets.idb /var/lib/mysql/zm/
alter table MonitorPresets import tablespace;lock tables Monitors write;
alter table Monitors discard tablespace;
# cp -p saved/Monitors.idb /var/lib/mysql/zm/
alter table Monitors import tablespace;lock tables Servers write;
alter table Servers discard tablespace;
# cp -p saved/Servers.idb /var/lib/mysql/zm/
alter table Servers import tablespace;lock tables States write;
alter table States discard tablespace;
# cp -p saved/States.idb /var/lib/mysql/zm/
alter table States import tablespace;lock tables TriggersX10 write;
alter table TriggersX10 discard tablespace;
# cp -p saved/TriggersX10.idb /var/lib/mysql/zm/
alter table TriggersX10 import tablespace;lock tables Users write;
alter table Users discard tablespace;
# cp -p saved/Users.idb /var/lib/mysql/zm/
alter table Users import tablespace;lock tables ZonePresets write;
alter table ZonePresets discard tablespace;
# cp -p saved/ZonePresets.idb /var/lib/mysql/zm/
alter table ZonePresets import tablespace;lock tables Zones write;
alter table Zones discard tablespace;
# cp -p saved/Zones.idb /var/lib/mysql/zm/
alter table Zones import tablespace;
After that, ‘systemctl restart zoneminder’ and hope for the best.
I have some Raspberry Pi0Ws that I’m connecting to a LAN via the USB gadget network driver on a Raspberry Pi3. The problem I encountered was that the usb[0-3] interfaces weren’t showing up when the Pi3 booted because the Pi0w’s booted later. Only ‘eth0’ appeared on ‘br0’.
You need to make sure to add the usb[0-3] interfaces to the Bridge when the Pi0w’s boot. This also works if Pi0W’s are plugged in after the Pi3 is already booted. A simple change to /etc/network/interfaces is all it took to make this happen:
auto br0
iface br0 inet dhcp
bridge_ports eth0 usb0 usb1 usb2 usb3
bridge_stp off
bridge_fd 0
bridge_waitport 0allow-hotplug usb0
allow-hotplug usb1
allow-hotplug usb2
allow-hotplug usb3auto usb0
iface usb0 inet static
address 10.0.0.1
netmask 255.255.255.0
up ifconfig usb0 up
up brctl addif br0 usb0auto usb1
iface usb1 inet static
address 10.0.0.2
netmask 255.255.255.0
up ifconfig usb1 up
up brctl addif br0 usb1auto usb2
iface usb2 inet static
address 10.0.0.3
netmask 255.255.255.0
up ifconfig usb2 up
up brctl addif br0 usb2auto usb3
iface usb3 inet static
address 10.0.0.4
netmask 255.255.255.0
up ifconfig usb3 up
up brctl addif br0 usb3
Note the IP addresses on the individual usb[0-3] interfaces are irrelevant. Those are present only so I can bring the interface ‘up’.
The thermostat arrived and I was excited. I plugged it in on my bench at home and the first thing I found was the temperature sensor was off by about 5F. I knew I could set the calibration in the menus but wasn’t sure if the amount it was off was linear or not. I contacted tech support and received a response back almost right away. After a couple of back/forths with tech support, they offered to send me a wired temperature sensor to try instead. That was on November 12th. Since then, I’ve updated the firmware on the thermostat and now it has, twice, locked up completely. I have to cycle the power on it to get it to come back. I fired off another question to tech support and received no response.
It is now December 11th and I’ve not heard anything from tech support since the first instance on November 12th.
In the meantime, I’ve mounted the thermostat on the wall and hooked it up to my furnace and it seems to work fine enough. I’ve also modified a few scripts so I can continue to monitor it remotely. I’ve even written a bit of an API for it in Python.
It hasn’t hung on me since I mounted it to the wall so I’ll continue to keep an eye on that.
It’s still a great thermostat as long as you don’t want tech support.
Edit: Tech support is actually responsive. The problem is that my emails don’t reach them. They claim to have never received any emails from me even though I’ve confirmed in my mail logs that their MX has accepted my message. If I communicate with them via their web-form then tech-support is very responsive. Clearly they have some aggressive anti-spam filters on their email that are generating false-positives.
I have more or less switched to using Home Assistant to automate things at the cabin. One of the things I’ve had to do is integrate the Etherrain/8 from QuickSmart into HomeAssistant by creating a new component and switch module. This is currently (as of this writing) on a branch waiting for release integration.
Now the next thing was to automate the irrigation. HomeAssistant’s automation scripts take a bit of getting used to.. It’s certainly not very intuitive but it is what it is.
First the automation, to water the front beds at 7 AM on Mon/Wed/Fri if the chance of rain is <60%:
    - id: water_front_beds_on
      alias: Start Watering Front Beds mon/wed/fri at 7AM
      initial_state: on
      trigger:
        platform: time
        hours: 7
        minutes: 0
        seconds: 0
      condition:
        condition: and
        conditions:
          - condition: state
            entity_id: binary_sensor.rain_unlikely
            state: 'on'
          - condition: time
            weekday:
              - mon
              - wed
              - fri
      action:
        service: switch.turn_on
        entity_id: switch.front_beds
So the next question is likely “where does rain_unlikely come from”? It’s here:
    binary_sensor:
      - platform: threshold
        name: rain_unlikely
        threshold: 59
        type: lower
        entity_id: sensor.environment_canada_pop

      - platform: mqtt
        state_topic: environment_canada/pop
        name: environment_canada_pop
Essentially, an MQTT message with a percentage that is the “probability of precipitation”. But who generates this MQTT message? In fact, nobody really. This is just a placeholder sensor that holds the POP. But something must populate this. Well, here’s an Appdaemon script written in Python:
    import appdaemon.appapi as appapi
    import feedparser
    import sys
    import time
    import datetime

    class EnvCanada(appapi.AppDaemon):

      def initialize(self):
        if "locator" in self.args:
          loc = self.args["locator"]
        else:
          loc = "ab-52"  # Default to Calgary
        if "hr" in self.args:
          hr = int(self.args["hr"])
        else:
          hr = 4
        if "ahead" in self.args:
          add=int(self.args["ahead"])
        else:
          add = 0

        myargs={}
        myargs["loc"] = loc
        myargs["add"] = add
        myargs["module"] = self.args["module"]
        # First run immediately
        h = self.run_in(self.get_pop, 1, **myargs)
        # Then schedule a runtime for the specified hour.
        runtime = datetime.time(hr, 0, 0)
        h = self.run_once(self.get_pop, runtime, **myargs)

      def get_pop(self, args):
        loc = args["loc"]
        add = args["add"]
        d=feedparser.parse('http://weather.gc.ca/rss/city/{0}_e.xml'.format(loc))
        weekdays=["Monday","Tuesday","Wednesday","Thursday","Friday","Saturday","Sunday"]
        today = (weekdays[time.localtime().tm_wday+add])
        pop = 0
        for entry in iter(d.entries):
          if today in entry.title:
            if "howers" in entry.title:
              pop = 100
            if "POP" in entry.title:
              next=0
              for word in iter(entry.title.split(" ")):
                if next:
                  pop = int(word.rstrip("%"))
                if word == "POP":
                  next=1
        print("{0}: Got POP {1}".format(args["module"], pop))
        self.set_state("sensor.environment_canada_pop", state = pop)

      def terminate(self):
        self.log("Terminating!", "INFO")
This essentially grabs the Atom feed from Environment Canada, looks for the word “Showers” or “showers” or “POP” and generates that percentage. It then reaches under the skirt of Home Assistant and populates the above mentioned ‘MQTT sensor’.. I really wish I could think of a better way to do that.
Just for the sake of completion; here is the AppDaemon configuration to get it all started:
  EnvCanada:
  module: environment_canada
  class: EnvCanada
  hr: 5
  ahead: 0
  locator: ab-53
The ‘ahead’ attribute is “how many days ahead to determine the POP. Ie: at 0, it returns todays probability of precipitation. At 1, it will return tomorrow’s. the ‘hr’ attribute is when AppDaemon should run this script. In this case, at 05:00AM. The ‘locator’ is the portion of the URL that specifies which Environment Canada weather location to use. ‘ab-53’ is Sundre Alberta.
Hope that helps someone.
Another “memo to self” …
[ Edit: minor change for Proxmox 5.x at bottom]
Having trouble doing an NFS mount from within a Proxmox LXC container? A google search took me here and it pretty much answers the question but doesn’t work with Proxmox 4.4-1. The error I was seeing after following the advice in the above was:
apparmor="STATUS" operation="profile_replace" profile="unconfined" name="lxc-container-default-cgns" pid=11339 comm="apparmor_parser"
So you also need to edit /etc/apparmod.d/lxc/lxc-container-default-cgns and make it look like so:
# Do not load this file. Rather, load /etc/apparmor.d/lxc-containers, which
# will source all profiles under /etc/apparmor.d/lxc

profile lxc-container-default-cgns flags=(attach_disconnected,mediate_deleted) {
 #include <abstractions/lxc/container-base>

# the container may never be allowed to mount devpts. If it does, it
 # will remount the host's devpts. We could allow it to do it with
 # the newinstance option (but, right now, we don't).
 deny mount fstype=devpts,
 mount fstype=nfs,
 mount fstype=cgroup -> /sys/fs/cgroup/**,
}
and then subsequently do:
service apparmor reload
Edit: On proxmox 5.2-1 the file is /etc/apparmor.d/lxc/lxc-default-cgns. The rest of the above is still correct.